
Download VCRUNTIME140.dll and fix error in Windows
If you encounter a VCRUNTIME140.dll error in Windows 10, then we will analyze several working solutions to fix this problem. This error often occurs when opening applications. The message appears when the system does not find the necessary DLL file that is required to run the program. Another possible cause of the error is damage to the Dynamic-link library (.DLL) on your computer. As a result, you can not run the programs, applications and games associated with the file VCRUNTIME140.dll, which gives the error that it is missing. To fix this error, you need to download the VCRUNTIME140.dll file, which is located in the Visual Studio program.
Dynamic Link Libraries (DLL) – A dynamic link library, these are parts of applications running on the Windows operating system. Most applications are not complete and they store codes in different files. If necessary, when the system cannot get a specific DLL file, it displays an error message indicating the absence of DLL files.
Download VCRUNTIME140.dll error in Windows 10
VCRUNTIME140.dll is basically an extension of the Microsoft Runtime Library application. It is located in the “System32” folder and in the Microsoft Visual Studio installation program itself. When you try to run a program, the absence of the above DLL file results in the following error:
The program cannot be started because VCRUNTIME140.dll is missing on the computer. Try reinstalling the program.

See also :DOWNLOAD D3DX9_43.DLL OR XINPUT1_3.DLL FOR WINDOWS 10/8/7
1)Restore Visual C ++ Redistributable for Visual Studio 2015
The VCRUNTIME140.dll file comes with the Visual C ++ Redistributable package for Visual Studio 2015. It is really necessary to run all software developed using C ++. In fact, repairing a Visual Studio package can fix a missing DLL error. To fix the error, you need to follow the instructions below.
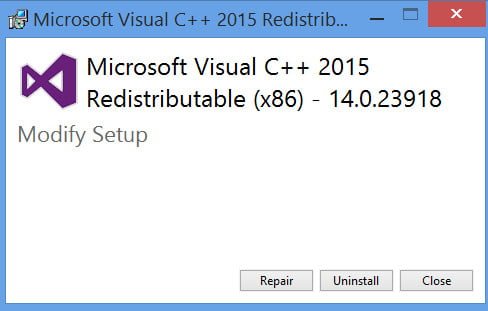
Open Settings> App and find the latest version of Microsoft Visual C ++ Redistributable for Visual Studio Package and click on it.
I have the last package in this picture this is 2017, but for many 2015.
Click the “Modify” button.

A program window will appear on the screen, click “Repair”.
Wait for the restore process to complete. Then restart your Windows 10 computer, and check for an error. If the error appears, then go to the next item.
2)Reinstalling Visual C ++ Redistributable for Visual Studio 2015
If you are unable to resolve the VCRUNTIME140.dll error in windows 10, then a suitable option is to reinstall Visual Studio 2015.
Remove the old Microsoft Visual C ++ 2015 Redistributable package. (You can delete the method above, just click “Uninstall”).
After removing the package, download a new microsoft from the site. Click on the website “Download” VCRUNTIME140.dll and select with the appropriateness of your system vc_redist.x64.exe (64-bit version) or vc_redist.x86.exe (for 32-bit systems) and click “Next.”
After installation, restart the computer and check if the error appears.
3)Make a copy of the DLL file in the program folder
Copying the DLL file to a specific software folder can fix the missing VCRUNTIME140.dll file error on a Windows 10 computer. Follow these steps.
Open “this pc” and go to C: \ Windows \ System32.
Type in the search above Vcruntime140.dll.
After finding the file, select it and press Ctrl + C to copy it.
Now open the special software folder that gives an error and paste the copied DLL file into it using the Ctrl + V key combination.

If the above helps nothing, then for sure the VCRUNTIME140.dll error in windows 10 is caused by the presence of damaged system files. Therefore, running the built-in SFC tool can fix this problem. See the detailed tutorial on how to restore the SFC and DISM system files, but we will briefly do the following on how to restore the windows 10 files.
Open a command prompt on behalf of the administrator by typing the word cmd in the windows search (near the start button), right-clicking on it and launching as the admin.
At the command prompt, type the following sfc / scannow command by pressing “Enter”.
The process may take a long time, wait until the end and the system will automatically find the damaged files and fix them, then reboot and check if the error is fixed.
5)Reinstalling the problem application
If all of the above solutions cannot fix the error, you need to remove the affected program and then reinstall it.
Go to “Options”> “Applications”, find the program that gives the error and delete it.
After uninstalling the program, visit the manufacturer’s website and download the latest version.


