
How to fix Winload.efi file missing error on Windows 10
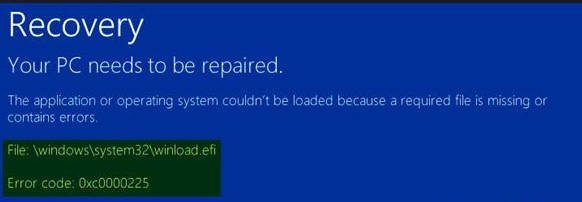
Winload.efi is an EFI or extensible firmware interface file. These files are executable for the embedded software of computers, which are mainly based on UEFI and perform the tasks of downloading files to the computer loader. These files are used for a specific set of tasks, such as turning on the computer, restarting the computer, installing Windows, restarting the computer, and others. Consequently, Winload.efi becomes a really important file. If this file is missing or damaged, then the Windows operating system will not be able to continue.
Related post : What is $SysReset folder? How to delete $SysReset folder
Errors are shown in different forms:
- Missing winload.efi.
- winload.efi could not be found.
- winload.efi is missing or has errors.
- This program cannot start because winload.efi is missing on your computer.
- This application requires the file winload.efi, which was not found on this system.
- There was a problem running \ winload.efi. The specified module could not be found.
Accompanying codes:
- 0xc0000225
- 0xc00000e
- 0xc0000001
Fix Winload.efi Error
The first thing you need to do is try to roll back the system using a restore point. If you do not have the habit of creating a system restore point, then I recommend it. And now let’s look at ways to fix the annoying problem on a blue screen.
1. Restore BCD
You need to create a Windows 10 installation flash drive and boot from it into advanced options. Go to the “Install” and below click on “Repair your computer”.
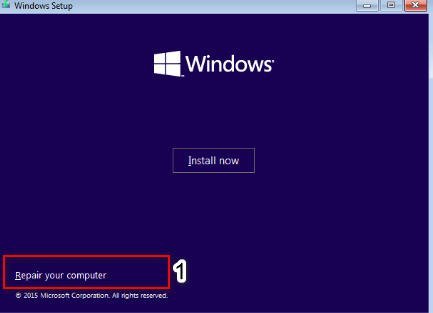
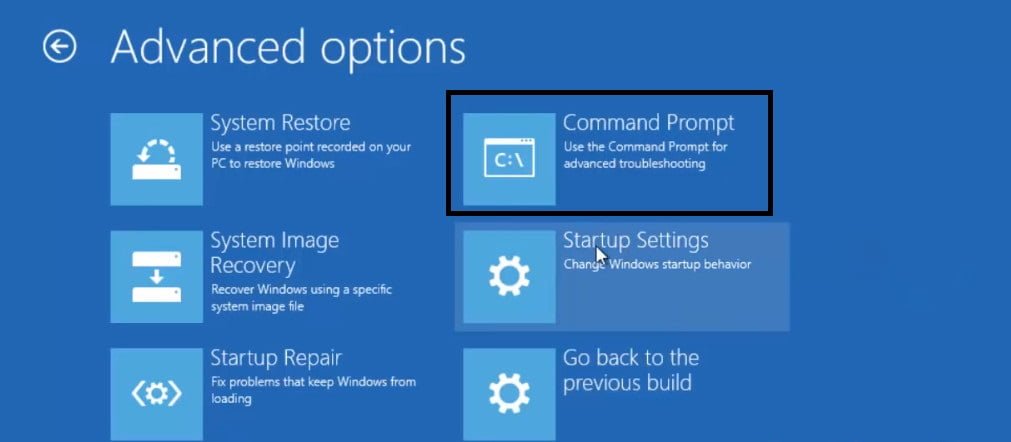
Next, you will be transferred to the advanced system settings, where you can go to the “Troubleshoot”> “Advanced options”> “Command line” settings.
Related post : How to change the screen resolution in Windows 10
In the command window, specify the following commands in the sequence in which they are written below. Then restart the PC for the changes to take effect.
bootrec / repairbcd
bootrec / osscan
bootrec / repairmbr
2. Disable secure boot
You need to try to disable Secure Boot in the BIOS, if enabled. To get started, go to “Windows Update” and update all the proposed device drivers, if they are there. Secure Boot is a kind of key encryption tool for verifying boot code signatures. If the signatures do not match, the download will not be successful.
To enter the BIOS, restart your PC or laptop, and when turned on, immediately press the DEL, F2 or Esc button to get into the BIOS settings. Each manufacturer has different buttons for entering the BIOS. BIOS and UEFI are a lot of varieties, I can only roughly show this setting. I recommend to drive your brand of motherboard in Google or Yandex and search in pictures how to disable Socure boot.
Approximately in BIOS you have to go through the settings “Security”, “Boot” or “Authentication”. Next you will see that Socure boot (Enable) is Enabled. Select Disable to disable. Press F10 to save the changes and restart the PC.
3. Checking system files
Run the command prompt as administrator and enter the sfc / scannow command. This command will check the system files for damage and will try to repair them, if any. Restart the system after the scan is complete.
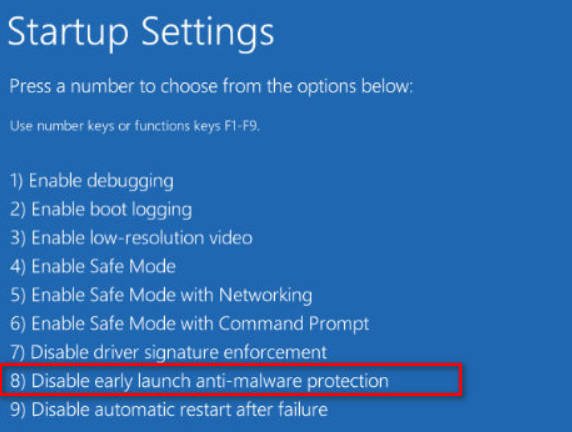
4. Disable early malware protection.
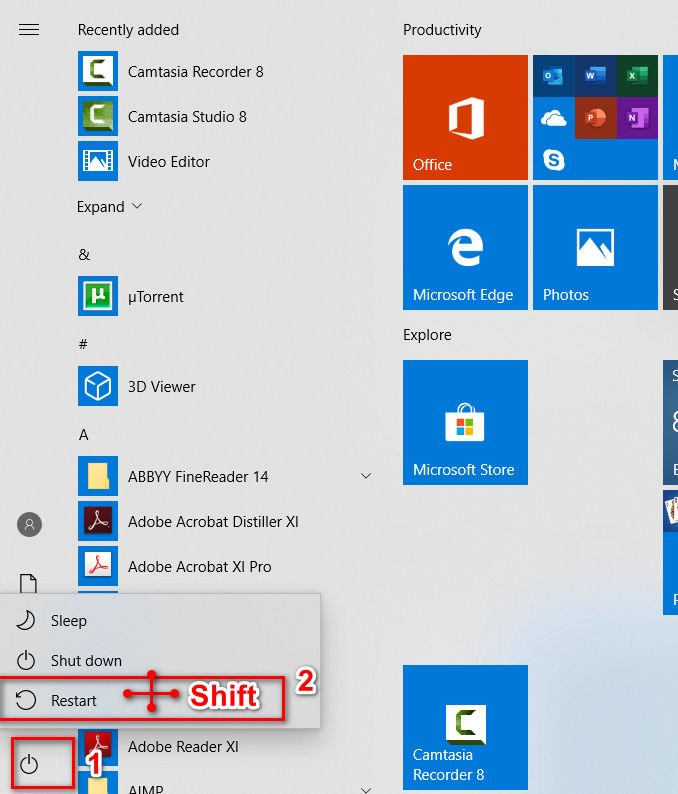
You need to get into the advanced options of Windows. To do this, hold down the “Shift”, select in the start menu “Shutdown” and “Restart”.
Next, go to the parameters “Troubleshoot”> “Advanced Options”> “Download Options”> “Restart”> “Disable early start of anti-virus protection.” You need to press F8.
Related post : What is the file Hiberfil.sys and how to disable or delete…


