
How to fix Mapped Network Drives issue in Windows 10 version 1809 easily
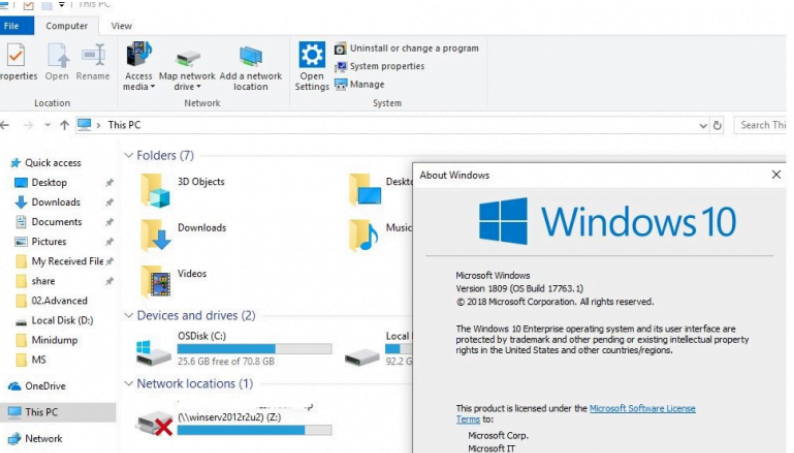
Users who recently upgraded to Windows 10 October 2018 Update (version 1809) have stopped connecting network drives when Windows starts. After logging in, the user in Windows Explorer sees a big red cross on the icons of all connected network drives. If you run the command net use in the command line, then you will see the status Unavailable next to all connected disks. Neither user-attached network drives, nor GPO-connected drives automatically reconnect.
Connection failure of network drives after upgrading to Windows 10 1809
Related post : Microsoft Store does not work in Windows 10
At the same time, a pop-up window appears in the notification area with the text:
- Could not reconnect all network drives.
- Failed to restore connections to all network drives.

Network drives simply cease to be mounted automatically after restarting the computer with Windows 10 1809. Network drives are displayed in Explorer, but connection to them is unavailable. The problem occurs with both drives connected to NAS devices, and with network folders on other Windows / Linux computers. This bug in Windows 10 1809 updates is recognized by Microsoft and is planned to be fixed in early 2019. At the moment, the Microsoft website offers a workaround to the problem of restoring connectivity to network drives (see KB4471218 for Windows 10, version 1809). To do this, at login, it is suggested to run a certain script, or, if network drives are connected through group policies, change the settings of the GPO.
The script automatically reconnect network drives when you log on to Windows
Open notepad (notepad.exe), copy the following PowerShell code into it and save the file to the C: \ PS directory named MapDrives.ps1:
$ i = 3
while ($ true) {
$ error.clear ()
$ MappedDrives = Get-SmbMapping | where -property Status -Value Unavailable -EQ | select LocalPath, RemotePath
foreach ($ MappedDrive in $ MappedDrives)
{
try {
New-SmbMapping -LocalPath $ MappedDrive.LocalPath -RemotePath $ MappedDrive.RemotePath -Persistent $ True
} catch {
Write-Host “Error connecting the $ MappedDrive.RemotePath network directory to the $ MappedDrive.LocalPath disk”
}
}
$ i = $ i – 1
if ($ error.Count -eq 0 -Or $ i -eq 0) {break}
Start-Sleep -Seconds 30
}
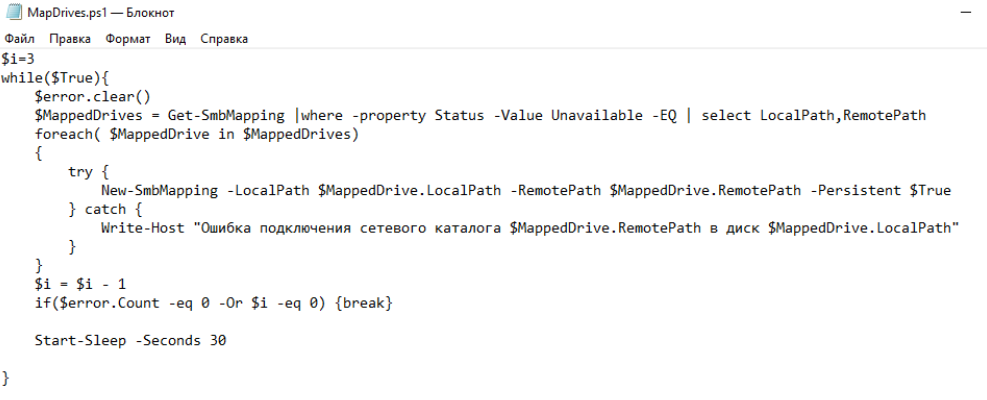
This script selects all inaccessible network drives and tries to reconnect them in constant mode (Persistent key).
Create another MapDrives.cmd script file with the code:
PowerShell -Command “Set-ExecutionPolicy -Scope CurrentUser Unrestricted” >> “% TEMP% \ StartupLog.txt” 2> & 1
PowerShell -File “% SystemDrive% \ PS \ MapDrives.ps1” >> “% TEMP% \ StartupLog.txt” 2> & 1
This code allows you to correctly call the PowerShell script described above.
You can place the file in the user’s autoload by copying the MapDrives.cmd file to the% ProgramData% \ Microsoft \ Windows \ Start Menu \ Programs \ StartUp directory.
You can also create a scheduler task to launch the MapDrives.cmd file when a user logs on. You can create a scheduler job using PowerShell or from the Windows Scheduler Console graphical user interface (Taskschd.msc).
- Create a new task, specify its name, select what task should be launched on behalf of the built-in Users group (Builtin \ Users).
- On the Triggers tab, select that the task should run when any user logs on to the system
- On the action tab in the Program field, specify the path to the MapDrives.cmd file.
- On the Condition tab, you can enable the option Network -> Run only when connected to the next network -> Any connection.
- Log in or reboot your computer. When the user logs in, the script should start, which will re-create all network connections.
Please note that by default network drives connected in the privileged mode are not available in normal mode and vice versa. But you can fix it – see the article Mounted network drives are not accessible from the privileged command line.
Connecting network drives via GPO
If you connect network drives to users using domain group policies, you need to change the policy settings in order to connect the drives correctly.
Open the policy that connects the drives, and in the User Settings -> Preferences -> Windows Settings -> Drive maps section, find your network drive assignment policy (policies) and change the action type from Update to Replace.
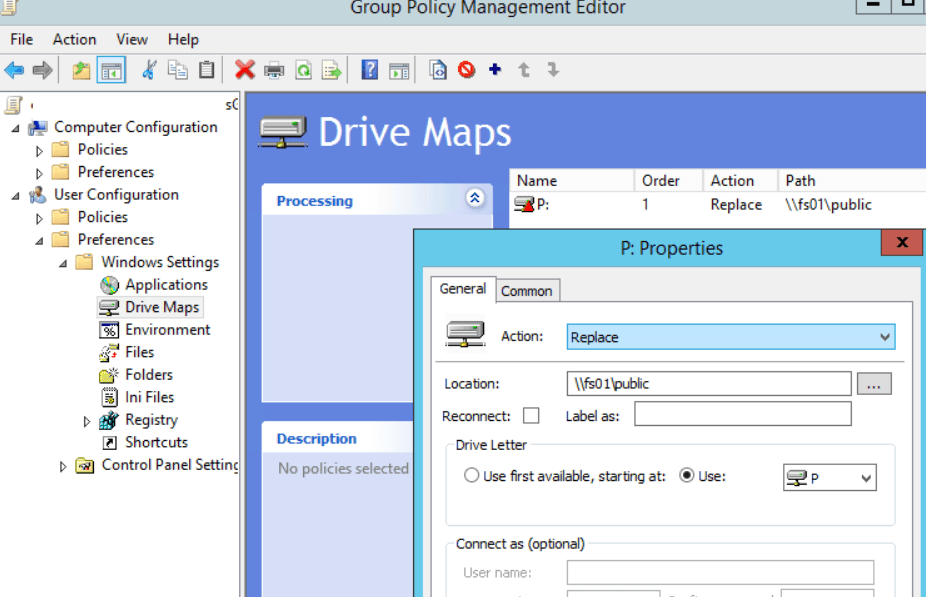
After the policy is updated on the clients when the user logs in, the network drives will be deleted and assigned again.
See also : Hidden currency converter in Windows 10


