How to find, enable and set up a screen saver in Windows 10
Turning on the screen saver or accessing the screen saver settings is not a special task in Windows 10, especially for users who have just updated to the latest version of the Windows operating system. The classic Personalization window (from where we could access the screensaver settings) was removed from Windows 10, and the new settings application also does not include the ability to enable the screensaver settings. Screensavers continue to be part of the Windows 10 operating system. There are six screen savers available: three-dimensional text, ribbons, bubbles, a hoax, a blank (shows a black screen) and photos as a screen saver. If you installed new screensavers, they will also appear in this list. You just need to access the settings and enable them. In this guide, we will explain how to access the screen saver in Windows 10 and enable it.
How to get to the screensaver settings in Windows 10
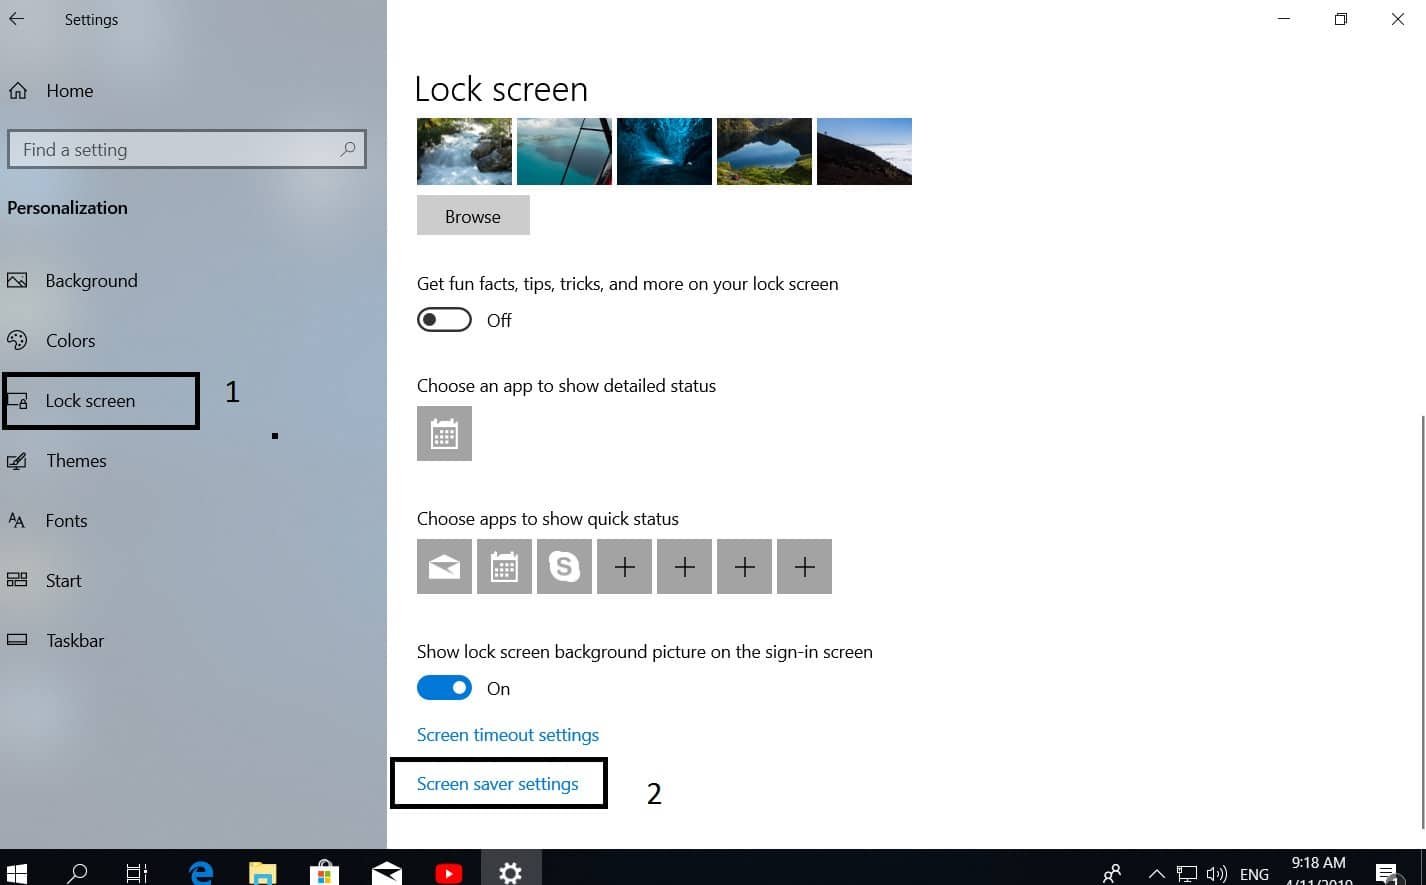
1 way. Open Settings> Personalization> Lock Screen> Screen Saver Settings.
Related post : Wi-Fi network disappears in Windows 10 after getting out of sleep…
Setup and activate a third-party screen saver in Windows 10
If you are not satisfied with the default set of screensavers, you can download interesting ones from the Internet. However, be sure to download only those places that you trust. And if you don’t know where to download, you can safely download screensaver. For all the screensavers that are there. Click here to download Windows 10 screensaver .
To install a third-party screen saver in Windows 10:
If you want to make sure that it is not a accident, you will have to copy it.
“Install.”
Automatically opens the Screen Saver Settings dialog box with the new one selected. Click the “Apply” button to apply the newly installed screen saver.
If you set a password, you can select the password box.
Read more :How To Fix Critical Process Died Error In Windows 10
How to set up photos as screen saver in Windows 10
Fortunately, you do not need to use a third-party tool for setting photos as a screensaver in Windows 10. You can use the built-in screensaver function in Windows 10 to set photos as a screensaver in Windows 10. You can set one photo or several photos as screensaver Windows 10. When you install multiple photos, Windows 10 will show these photos as a slideshow.
Go to the settings as described above and select in the “Screen Saver” column> Photos. In Windows 10, it will automatically start immediately showing your photos that are in the photo application. You can also specify any folder with a photo for displaying a slide show on the screen by clicking on Options and Browse.
Read also :How to add folders,files,programs to send menu in Windows 10