
How to fix BAD_SYSTEM_CONFIG_INFO Error on Windows
Fix BAD_SYSTEM_CONFIG_INFO Error on Windows
BAD SYSTEM CONFIG INFO usually occurs due to some problems with the boot configuration data file (BCD). The main problem inside BCD is the fact that some download files or some old files may conflict with newer or more stable files and, therefore, cause a “Blue Screen of Death” error in Windows 10/8/7. This error also indicates the presence of an error in the registry. Let’s try to fix it.
BAD_SYSTEM_CONFIG_INFO
To get started, boot into safe mode on your desktop, and then restart your PC to its normal state and check if the problem is fixed. If overloading does not fix the problem, registry damage may be too extensive. Let us analyze the ways, when you can boot to the desktop and when the error is cyclic, and does not allow to boot.
1. Roll back the system
If you have a system restore point, try to restore it to an earlier point, i.e. Roll back your Windows system to earlier stable operation.
2. Upgrade Windows and all your drivers
Update your Windows system from the update center. If you do not have an Internet connection, you can download separate update patches offline.
Update all your device drivers through device manager.
3. Use RAM memory diagnostics.
Click the Win + R key combination and enter the mdsched.exe command. Follow the instructions on the screen. Your computer will reboot and check for any memory problems, and if it detects any of these problems, it will fix them.
A complete guide to correcting errors in RAM.
4. Fix windows registry files
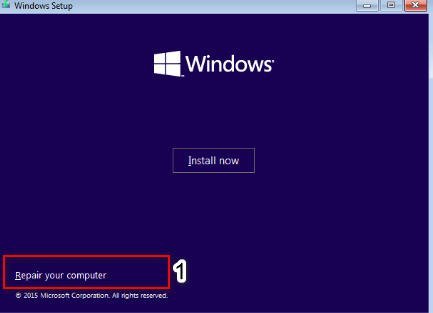
Step 1. This item is if you can not boot to the desktop, and the error all the time appears in a cyclical state. You will need an installation flash drive with Windows 10/8/7 /. Next, start the installation of Windows, and when you get to the installation point, then click on the bottom of the “Repair your computer”.
Related post : How to Block (Prevent) users from running certain Applications in Windows…
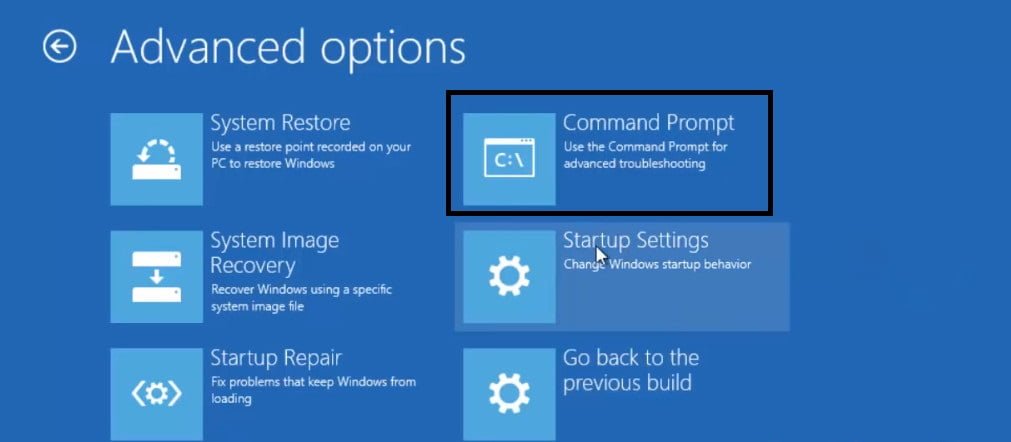
Step 2. You will be transferred to the advanced settings of windows 10. Next, go to the Troubleshooting settings> Advanced settings> Command line.
Related post : Windows Modules Installer Worker High CPU & Disk Usage
Step 3. As soon as you open the command line window, execute the following commands, one after the other in the specified sequence below.
CD C: \ Windows \ System32 \ config
ren C: \ Windows \ System32 \ config \ DEFAULT DEFAULT.old
ren C: \ Windows \ System32 \ config \ SAM SAM.old
ren C: \ Windows \ System32 \ config \ SECURITY SECURITY.old
ren C: \ Windows \ System32 \ config \ SOFTWARE SOFTWARE.old
ren C: \ Windows \ System32 \ config \ SYSTEM SYSTEM.old
copy C: \ Windows \ System32 \ config \ RegBack \ DEFAULT C: \ Windows \ System32 \ config \
copy C: \ Windows \ System32 \ config \ RegBack \ SAM C: \ Windows \ System32 \ config \
copy C: \ Windows \ System32 \ config \ RegBack \ SECURITY C: \ Windows \ System32 \ config \
copy C: \ Windows \ System32 \ config \ RegBack \ SYSTEM C: \ Windows \ System32 \ config \
copy C: \ Windows \ System32 \ config \ RegBack \ SOFTWARE C: \ Windows \ System32 \ config \
Finally, type exit to close the command prompt window. Restart your computer for the changes to take effect.
Step 4. Fix BCD files
If the above method did not help, then restore the BCD and MBR. To do this, you will need again an installation USB flash drive with a Windows system. Next, run the command line, as described in method 4, step 2. Enter the following commands on the command line in order:
bootrec / repairbcd
bootrec / osscan
bootrec / repairmbr
Type exit to close the command prompt. Restart your computer for the changes to take effect.


